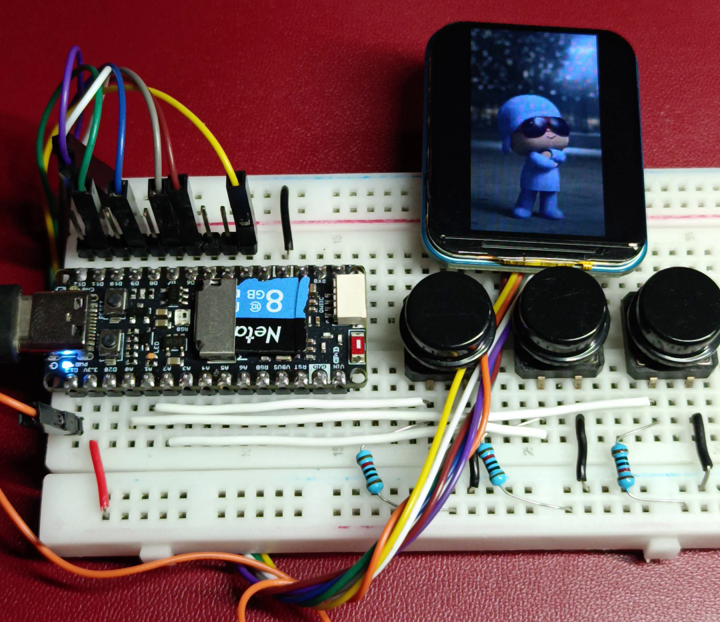
El siguiente proyecto tiene como objetivo mostrar videos, imágenes y archivos de texto en una pantalla LCD utilizando la placa de desarrollo Unit Pulsar ESP32-C6, la cual integra una ranura para tarjeta microSD.
@microchipotle Pulsar ESP32-C6 de @UNIT Electronics #electronica #programacion #arduino ♬ sonido original - Microchipotle
Código en Arduino IDE
#include "SPI.h"
#include "SD.h"
#include "JPEGDecoder.h"
#include "Adafruit_GFX.h"
#include "Adafruit_ST7789.h"

/* ================= PINES ================= */
constexpr uint8_t TFT_CS   = 9; //D3
constexpr uint8_t TFT_DC   = 13; //D9
constexpr uint8_t TFT_RST  = 20; //D6
constexpr uint8_t TFT_BL   = 21; //D7

constexpr uint8_t SD_CS    = 19; //D5

constexpr uint8_t SPI_MOSI = 7; //D11
constexpr uint8_t SPI_MISO = 2; //D12
constexpr uint8_t SPI_SCLK = 6; //D13

constexpr uint8_t LED_PIN  = 8; //D2

constexpr uint8_t BTN_UP   = 0; //A0
constexpr uint8_t BTN_DOWN = 1; //A1
constexpr uint8_t BTN_OK   = 3; //A2

/* ================= TFT ================= */
Adafruit_ST7789 tft(TFT_CS, TFT_DC, TFT_RST);

/* ================= VIDEO ================= */
constexpr uint32_t BUFFER_SIZE = 32768;
uint8_t buffer[BUFFER_SIZE];

File mjpegFile;
char mjpegPath[20];
uint8_t currentVideo = 1;
uint8_t currentImage = 1;
uint8_t currentText  = 1;

/* ================= ESTADOS ================= */
enum Estado {
  MENU,
  VIDEO,
  IMAGEN,
  TEXTO
};
Estado estado = MENU;
Estado estadoAnterior = MENU;

/* ================= UTILIDADES ================= */
bool buttonPressed(uint8_t pin) {
  if (!digitalRead(pin)) {
    delay(10);
    while (!digitalRead(pin));
    delay(10);
    return true;
  }
  return false;
}

/* ================= JPEG ================= */
void drawJpegFromBuffer(uint8_t *data, uint32_t len) {
  if (!JpegDec.decodeArray(data, len)) return;

  uint16_t *pImg;
  uint16_t mcu_w = JpegDec.MCUWidth;
  uint16_t mcu_h = JpegDec.MCUHeight;

  while (JpegDec.read()) {
    pImg = JpegDec.pImage;
    int x = JpegDec.MCUx * mcu_w;
    int y = JpegDec.MCUy * mcu_h;
    tft.drawRGBBitmap(x, y, pImg, mcu_w, mcu_h);
  }
}

/* ================= VIDEO ================= */
bool openVideoFile() {
  snprintf(mjpegPath, sizeof(mjpegPath), "/video%02d.mjpeg", currentVideo);
  mjpegFile = SD.open(mjpegPath);
  return mjpegFile;
}

/* ================= TFT MODE ================= */
void configureTFTforState(Estado s) {
  tft.fillScreen(ST77XX_BLACK);
  if (s == VIDEO)
    tft.init(158, 280);
  else
    tft.init(240, 280);

  tft.setRotation(2);
}

void not_found(){
  tft.fillScreen(ST77XX_BLACK);
  tft.init(240, 280);
  tft.setRotation(2);
  tft.setCursor(0, 40);
  tft.setTextColor(ST77XX_WHITE);
  tft.setTextSize(3);
  tft.println("NO");
  tft.println("ENCONTRADO");
  delay(1500);
  estado = MENU;
}

void playVideo() {
  static uint32_t bufferPos = 0;
  static bool eofReached = false;

  if (!mjpegFile) {
    if (!openVideoFile()) {
      not_found();
      currentVideo = 1;
      bufferPos = 0;
      eofReached = false;
      return;
    }
    bufferPos = 0;
    eofReached = false;
  }

  if (!eofReached) {
    int bytesRead = mjpegFile.read(buffer + bufferPos, BUFFER_SIZE - bufferPos);
    if (bytesRead == 0) eofReached = true;
    bufferPos += bytesRead;
  }

  int32_t startIdx = -1, endIdx = -1;
  for (uint32_t i = 0; i < bufferPos - 1; i++) {
    if (buffer[i] == 0xFF && buffer[i + 1] == 0xD8 && startIdx == -1)
      startIdx = i;
    if (buffer[i] == 0xFF && buffer[i + 1] == 0xD9 && startIdx != -1) {
      endIdx = i + 1;
      break;
    }
  }

  if (startIdx != -1 && endIdx != -1) {
    drawJpegFromBuffer(buffer + startIdx, endIdx - startIdx + 1);
    memmove(buffer, buffer + endIdx + 1, bufferPos - endIdx - 1);
    bufferPos -= (endIdx + 1);
  }

  if (eofReached && bufferPos == 0) {
    mjpegFile.close();
    estado = MENU;
  }

  if (buttonPressed(BTN_OK)) {
    mjpegFile.close();
    estado = MENU;
  }
  if (buttonPressed(BTN_UP)) {
    mjpegFile.close();
    currentVideo++;
  }
  if (buttonPressed(BTN_DOWN) && currentVideo > 1) {
    mjpegFile.close();
    currentVideo--;
  }
}

void showBMP(const char *filename) {
  File bmp = SD.open(filename);
  if (!bmp) {
    not_found();
    currentImage = 1;
    return;
  }

  uint32_t dataOffset, width, height;

  bmp.seek(10);  bmp.read((uint8_t*)&dataOffset, 4);
  bmp.seek(18);  bmp.read((uint8_t*)&width, 4);
  bmp.read((uint8_t*)&height, 4);

  bmp.seek(dataOffset);

  tft.fillScreen(ST77XX_BLACK);

  static uint16_t lineBuffer[240];  // ancho máximo

  for (int y = height - 1; y >= 0; y--) {
    for (uint32_t x = 0; x < width; x++) {
      uint8_t b = bmp.read();
      uint8_t g = bmp.read();
      uint8_t r = bmp.read();
      lineBuffer[x] = tft.color565(r, g, b);
    }

    // Dibujar TODA la línea de una sola vez
    tft.drawRGBBitmap(0, y, lineBuffer, width, 1);
  }

  bmp.close();
}


void handleImages() {
  static bool first = true;
  char path[20];

  if (first) {
    snprintf(path, sizeof(path), "/img%02d.bmp", currentImage);
    showBMP(path);
    if (estado == MENU)
      first = true;
    else
      first = false;
  }

  if (buttonPressed(BTN_UP))    { currentImage++; first = true; }
  if (buttonPressed(BTN_DOWN) && currentImage > 1) { currentImage--; first = true; }
  if (buttonPressed(BTN_OK))    { first = true; estado = MENU; }
}

/* ================= TEXTO ================= */
void showTextFile(const char *filename) {
  File txt = SD.open(filename);
  if (!txt) {
    not_found();
    currentText = 1;
    return;
  }

  tft.fillScreen(ST77XX_BLACK);
  tft.setCursor(0, 40);
  tft.setTextColor(ST77XX_MAGENTA);
  tft.setTextSize(2);
  tft.setTextWrap(true);

  while (txt.available()) {
    tft.write(txt.read());
    if (buttonPressed(BTN_OK)) break;
  }
  txt.close();
}

void handleText() {
  static bool first = true;
  char path[20];

  if (first) {
    snprintf(path, sizeof(path), "/text%02d.txt", currentText);
    showTextFile(path);
    if (estado == MENU)
      first = true;
    else
      first = false;
  }

  if (buttonPressed(BTN_UP))    { currentText++; first = true; }
  if (buttonPressed(BTN_DOWN) && currentText > 1) { currentText--; first = true; }
  if (buttonPressed(BTN_OK))    { first = true; estado = MENU; }
}

/* ================= MENU ================= */
void drawMenu(uint8_t sel) {
  tft.fillScreen(ST77XX_BLACK);
  tft.setCursor(0, 40);
  tft.setTextSize(3);

  tft.setTextColor(sel == 0 ? ST77XX_GREEN : ST77XX_YELLOW);
  tft.println("Videos");
  tft.setTextColor(sel == 1 ? ST77XX_GREEN : ST77XX_YELLOW);
  tft.println("Imagenes");
  tft.setTextColor(sel == 2 ? ST77XX_GREEN : ST77XX_YELLOW);
  tft.println("Texto");
}

void handleMenu() {
  static uint8_t option = 0;
  static bool redraw = true;

  if (redraw) { drawMenu(option); redraw = false; }

  if (buttonPressed(BTN_UP))   { option = (option + 1) % 3; redraw = true; }
  if (buttonPressed(BTN_DOWN)) { option = option ? option - 1 : 2; redraw = true; }
  if (buttonPressed(BTN_OK))   { estado = option == 0 ? VIDEO : option == 1 ? IMAGEN : TEXTO; redraw = true; }
}

/* ================= SETUP ================= */
void setup() {
  pinMode(BTN_UP, INPUT_PULLUP);
  pinMode(BTN_DOWN, INPUT_PULLUP);
  pinMode(BTN_OK, INPUT_PULLUP);

  pinMode(TFT_BL, OUTPUT);
  digitalWrite(TFT_BL, HIGH);

  SPI.begin(SPI_SCLK, SPI_MISO, SPI_MOSI);
  SPI.setFrequency(80000000);

  tft.init(240, 280);
  tft.setRotation(2);
  tft.fillScreen(ST77XX_BLACK);

  if (!SD.begin(SD_CS)) while (1);
}

/* ================= LOOP ================= */
void loop() {

  if (estado != estadoAnterior) {
    configureTFTforState(estado);
    estadoAnterior = estado;
  }

  switch (estado) {
    case MENU:   handleMenu();   break;
    case VIDEO:  playVideo();    break;
    case IMAGEN: handleImages(); break;
    case TEXTO:  handleText();   break;
  }
}
Descargar librerias
- https://github.com/Bodmer/JPEGDecoder
- https://github.com/adafruit/Adafruit-GFX-Library
- https://github.com/adafruit/Adafruit-ST7735-Library/tree/master
Una vez descargadas en formato .ZIP, añade las librerías desde el entorno de Arduino siguiendo la ruta:
- Sketch –> Include Library –> Add .ZIP Library.
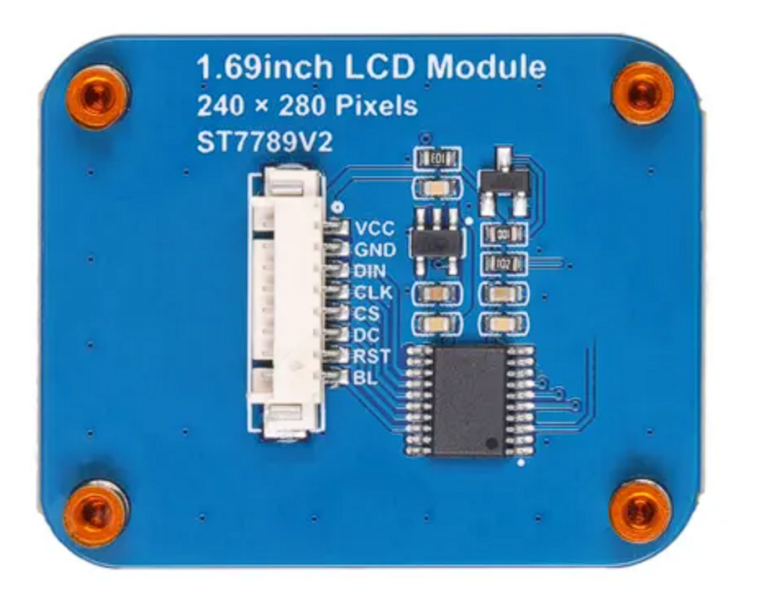
Conexión de display LCD 1.69″ SPI ST7789V2
- VCC –> 3.3V
- GND –>GND
- DIN–>D11/GPIO7/MOSI
- CLK–>D13/GPIO6/SCK
- CS–>D3/GPIO9
- DC–>D9/GPIO13
- RST–>D6/GPIO20
- BL–>D7/GPIO21
Conexión de botones
Los botones se conectan a los pines D14, D15 y D16 en configuración pull-up (en la placa se muestran como A0, A1 y A2).
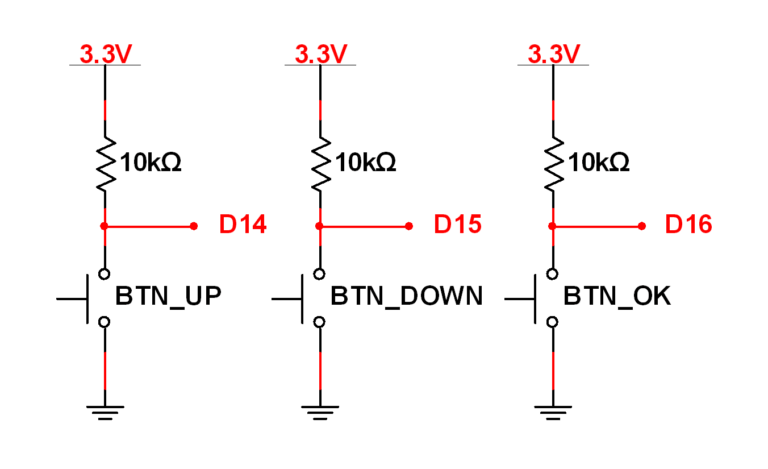
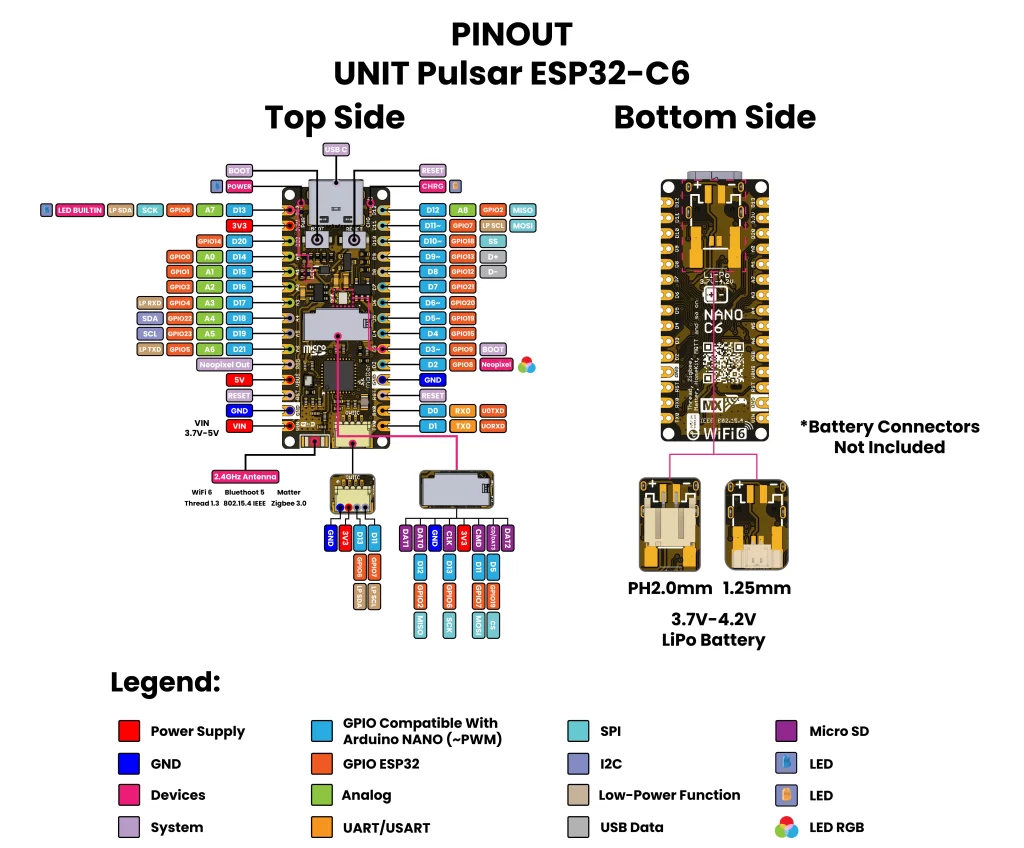
Diagrama de pines Pulsar ESP32-C6
Generar archivos multimedia
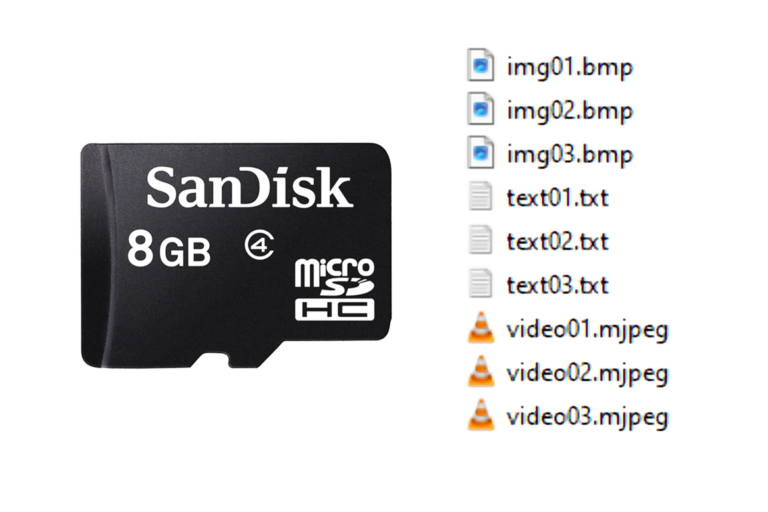
Los archivos de video, imágenes y texto se guardan en la memoria con el prefijo «img», «video» y «text», seguido de un número de dos dígitos del 01 al 99.
Ejemplos:
- img99.bmp
- video99.mjpeg
- text99.txt
El código solo soporta los formatos BMP, TXT y MJPEG.
Es necesario instalar FFmpeg para generar las imágenes y los videos con el tamaño adecuado para la pantalla LCD.
Pasos para generar una imagen o video:
- Abre la carpeta donde está el video o la imagen que deseas convertir.
- En la barra superior escribe CMD y presiona la tecla Enter (se abrirá el símbolo del sistema).
- Escribe el comando en la ventana de CMD con el nombre de la imagen o video que quieras generar, según sea el caso (imagen.jpg o video.mp4), y cambia el número de dos dígitos (img02 o video02) cuando sea necesario.
- ffmpeg -i imagen.jpg -vf scale=240:280 -q:v 1 img01.bmp
- ffmpeg -i video.mp4 -vf «scale=-1:280:flags=neighbor,fps=8» -c:v mjpeg -q:v 10 video01.mjpeg
- Presiona la tecla Enter en CMD para generar el archivo.
- Finalmente, guarda la imagen o el video en la memoria microSD.
Archivos en la tarjeta microSD